Lottie is one of those perplexing tools in a developer’s toolbox which defy the age-old notion that animations are hard to build, maintain and execute. It is a library for Android, iOS, Web, and Windows that parses Adobe After Effects animations exported as JSON with Bodymovin, renders them natively and makes it easy to work with complex animations.
ViewPager2, on the other hand, is an improved version of the ViewPager library that offers enhanced functionality and allows transitions between one entire screen to another and are regularly found in UIs like setup wizards or slideshows.
This article deals with an anecdotal case study of how we had set about to create a User OnBoarding flow, which uses Lottie Animations coupled with ViewPager2’s ability to provide granular control over screen transitions, and allowed us to create a rich and delightful onboarding experience for the user.
First things first
 As you can see from the design above, this is the current user onboarding flow built by the Android team at SuperShare, using just Lottie Animations, ViewPager2, some clever maths, and lots of coffee. It’s pretty clear that the GIF is only for representation, and its frame rate isn’t indicative of the actual performance of the app.
On a real device, this animation plays at a sweet 60fps.
For the sake of brevity and to keep things as simple and to the point, we won’t cover the boilerplate-y, housekeeping, and regular stuff such as adding library dependencies, setting up ViewPager2, adding Lottie Animations Views to some Layout XML, etc. We’ll skip directly to the meaty, exciting and fun parts.
From the design above, you can see that the onboarding flow revolves around three major pieces,
- Lottie animation playback, looping and frame control at a granular level
- Background colour transitions between black, white and yellow
- Synchronisation of UI elements like navbar and screen indicator with the scroll movement
Let’s go through them one at a time.
Lottie animation playback
The Lottie animation you see on each screen is two separate Lotties, conveniently named Primary and Secondary Lotties. The Primary Lottie is the large text that appears first in the background. The Secondary Lottie is the dynamic window that slides or fades in at the lower half of the screen after a certain period.
One of the challenges to implementing this behaviour was that the Secondary Lottie has two parts to it, and when it enters the canvas, say we split its frames into sections A -> B -> C, the Lottie has to playback the frames A -> B once, and then immediately switch to an infinite loop between the frames B -> C.
Another minor challenge was to synchronise the playback of Secondary Lottie animation, from a pre-specified frame of the ParentLottie, and reset this logic on every transition to a new page.
The data structure that we use to represent the Lottie based onboarding data:

We begin by setting up the logic to handle screen or page scroll transitions by registering an OnPageChangeCallabacklistener and implementing its methods on the instance of our ViewPager.

This OnPageChangeCallback listener is at the core of our logic to synchronise the horizontal finger based scroll movement with the progression or regression of our individual Lottie frames.
It provides us with three useful methods to override:
-
onPageScrolled(position: Int, positionOffset: Float, positionOffsetPixels: Int)This method is called every time there is a scroll event on the screen. Out of the three parameters available here,positionandpossitionOffsetare most useful in our case. Thepositionparameter varies from the 0 → (n - 1) where n is the number of pages initialised in the ViewPager and holds the current page that is entirely visible, whereas thepositionOffsetparameter varies within the floating range 0.0 → 1.0 and holds the current fractional offset value from the left edge of the device as the user scrolls on the screen. This value varies from 0.0 → 1.0 as the user scrolls from Right → Left, and 1.0 → 0.0 otherwise. -
onPageSelected(position: Int)This method is called when the screen or page has completed its scroll, and subsequently thepositionparameter holds the page number which varies from the 0 → (n - 1) where n is the number of pages initialised in the ViewPager. We personally used it to setup click listeners for the navbar elements, and also to control their visibility. -
onPageScrollStateChanged(state: Int)This method is called whenever the scrolling state for the page undergoes a change. The three possible states areSCROLL_STATE_IDLE,SCROLL_STATE_DRAGGINGandSCROLL_STATE_SETTLING. Again, we’ve used this to uniquely control the visibility of the navbar elements.
This is how we control Parent Lottie transitions relative to the degree of page scroll.

The handleParentLottieTransitions() method is called on every scroll event with the current position and positionOffset values as parameters. Here, we also check if the current page position is between 0 and the total pages defined in ViewPager, and the initial bit of the entry animation has played. If this is true, we update the frame property of the parent’s LottieView using a lerp() function, as given below:

The lerp() function essentially performs a **Linear Interpolation between two values, using a third value to specify the amount to interpolate between these two values. An amount nearer to 0.1 would mean that the final value is nearer to the firstValue, and nearer to 0.9 means that the value is nearer to the secondValue.
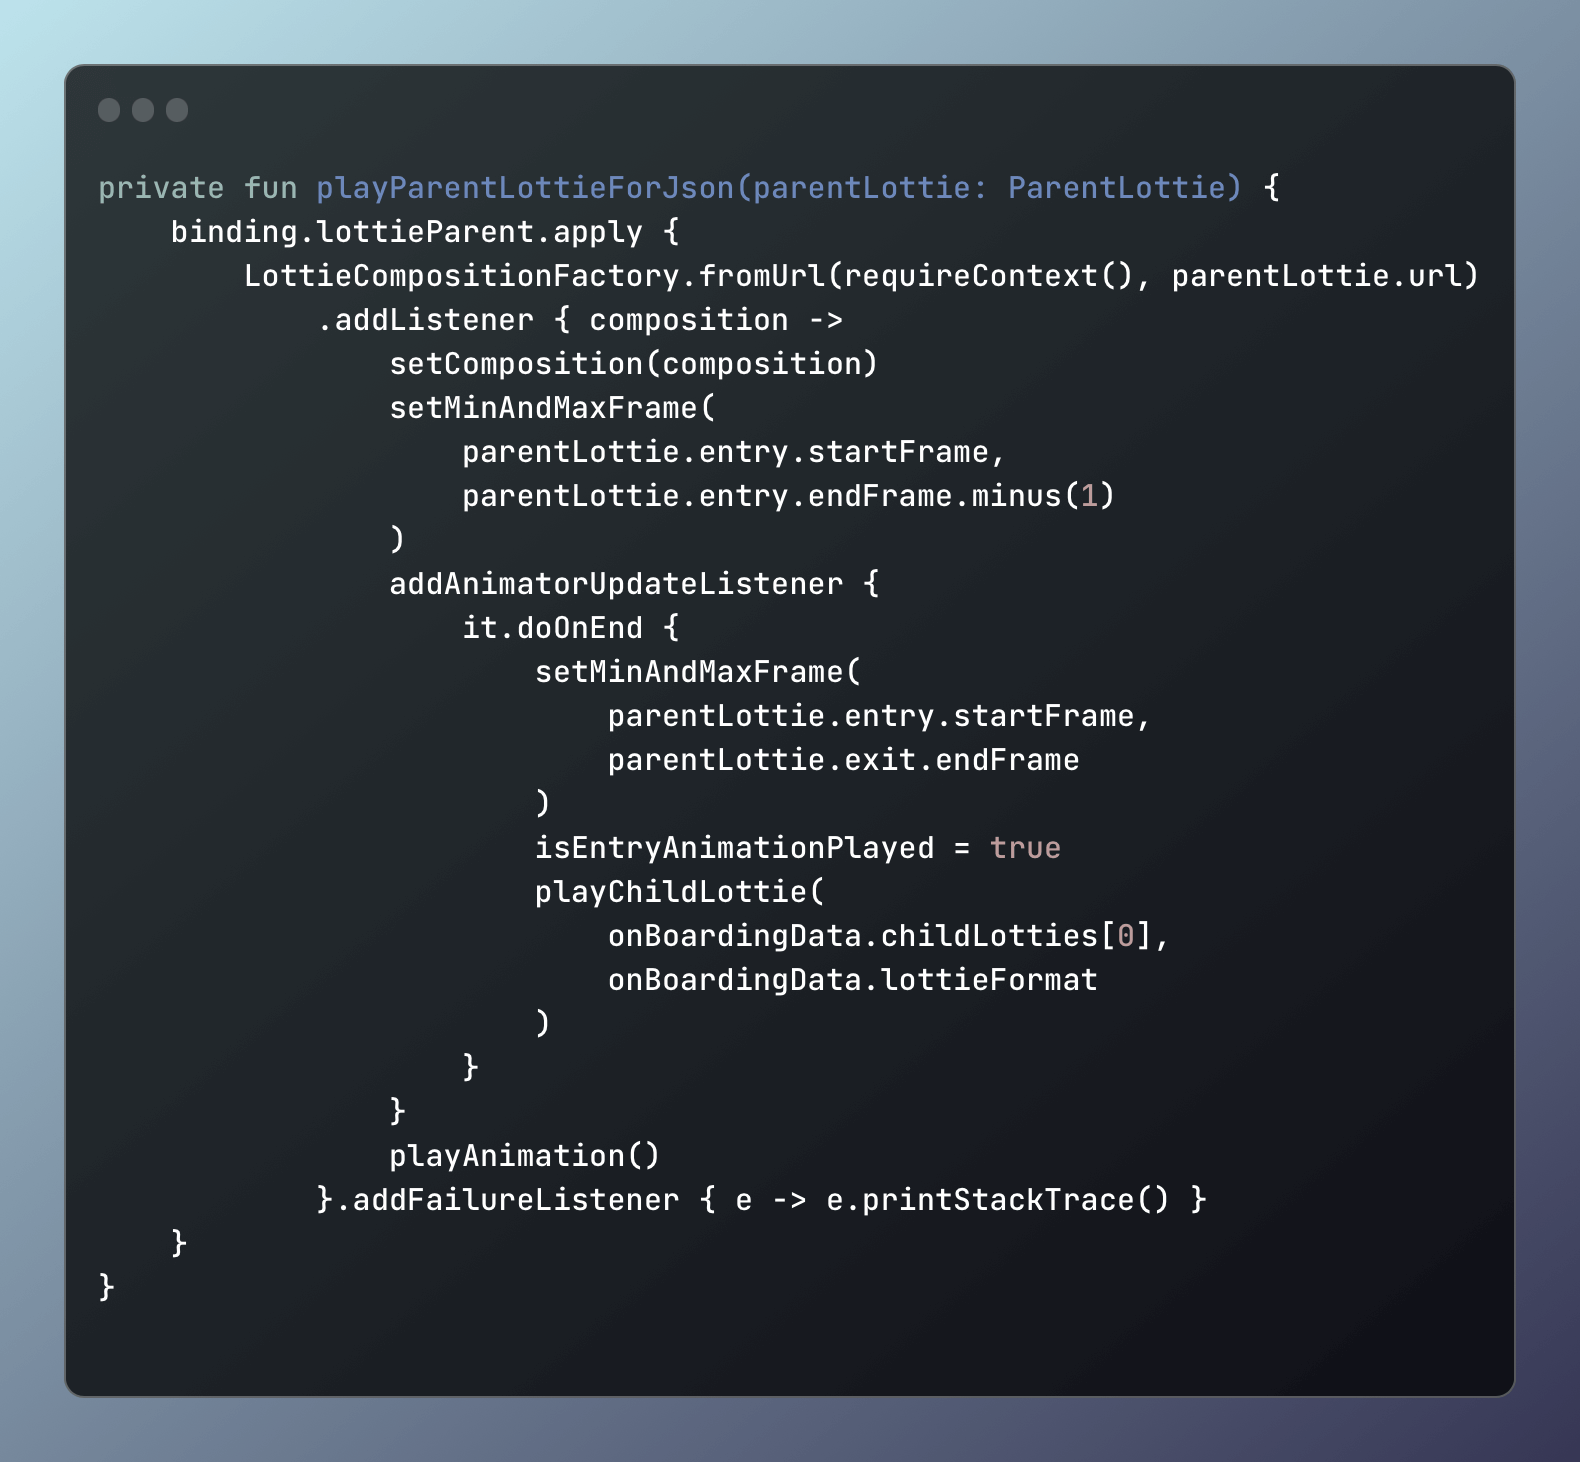
Subsequently, the normal playback of the Parent Lottie, say on a button press is as follows:

As its quite self-evident that ParentLottie is data model class which has properties such as url of the Lottie, start and end frames modelled as a FrameTuple for both entry and exit sections of the animation, and a list of pages or screens in-between modelled as a List<FrameTuple>.
We begin by using LottieCompositionFactory to load the Lottie from a url hosted on a network, and add a callback listener to await and set its composition. This is followed by setting the min and max frames of the Lottie, to the startFrame and endFrame of the entry section. Finally, at the end of playback of this section, we again reset the min and max frames to cover the entire range of the Lottie animation, and also initiate playback of that screen’s specific Child Lottie.
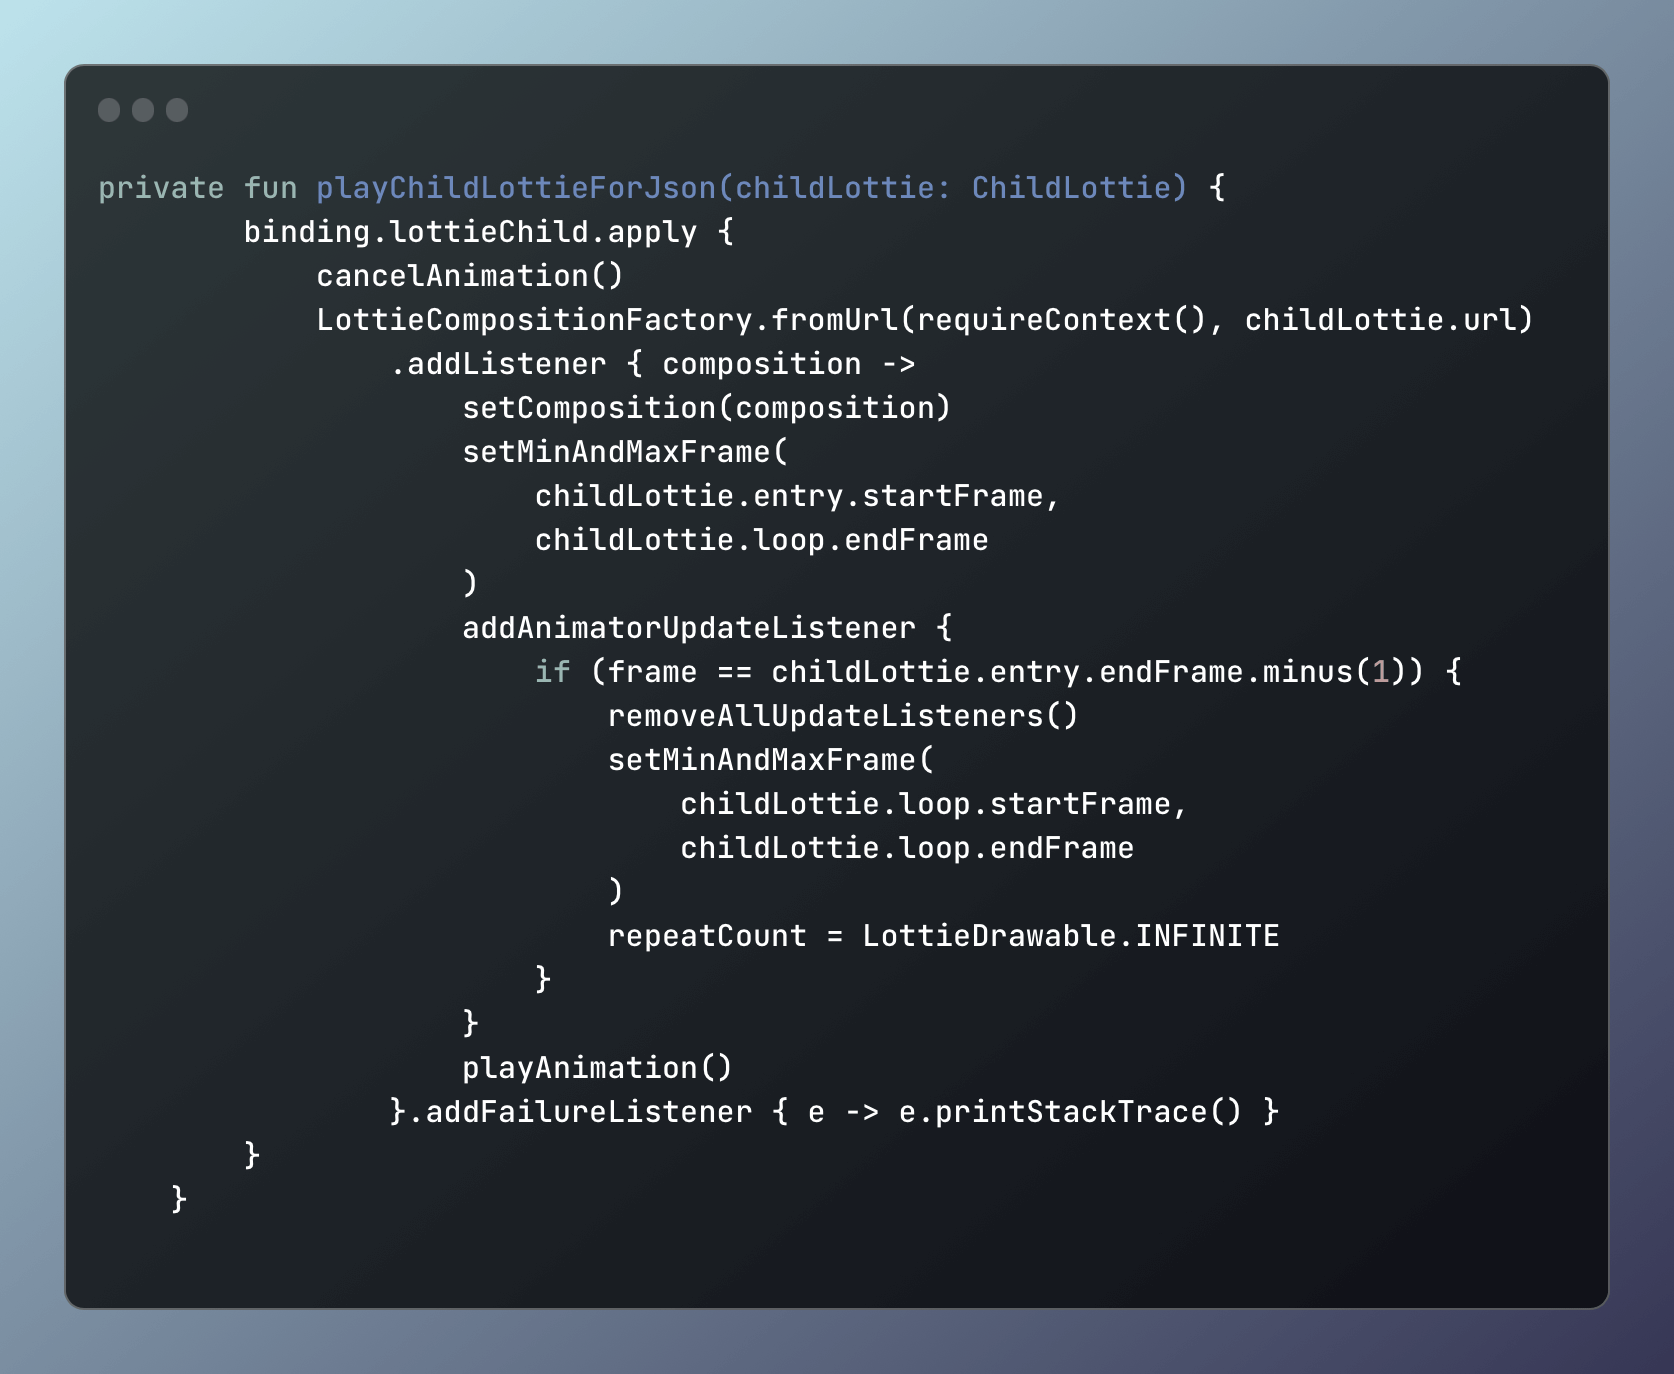
Similarly, the playback of Child Lottie is handled as follows:

Here, too the handling is very similar to how Parent Lottie is handled, except a few differences like we call cancelAnimation() at the top to terminate any existing Child Lottie that might be playing from the previous screen. Additionally, we add an update listener and inside it we check if the current frame is the endFrame of the entry section for Child Lottie, and if it is, we remove the update listeners to prevent any potential memory leaks, and unnecessary GC collections.
More importantly, we reset the min and max frames to startFrame and endFrame of the loop section of Child Lottie, and set the repeatCount property of the Lottie view to LottieDrawable.INFINITE.
Background colour transitions

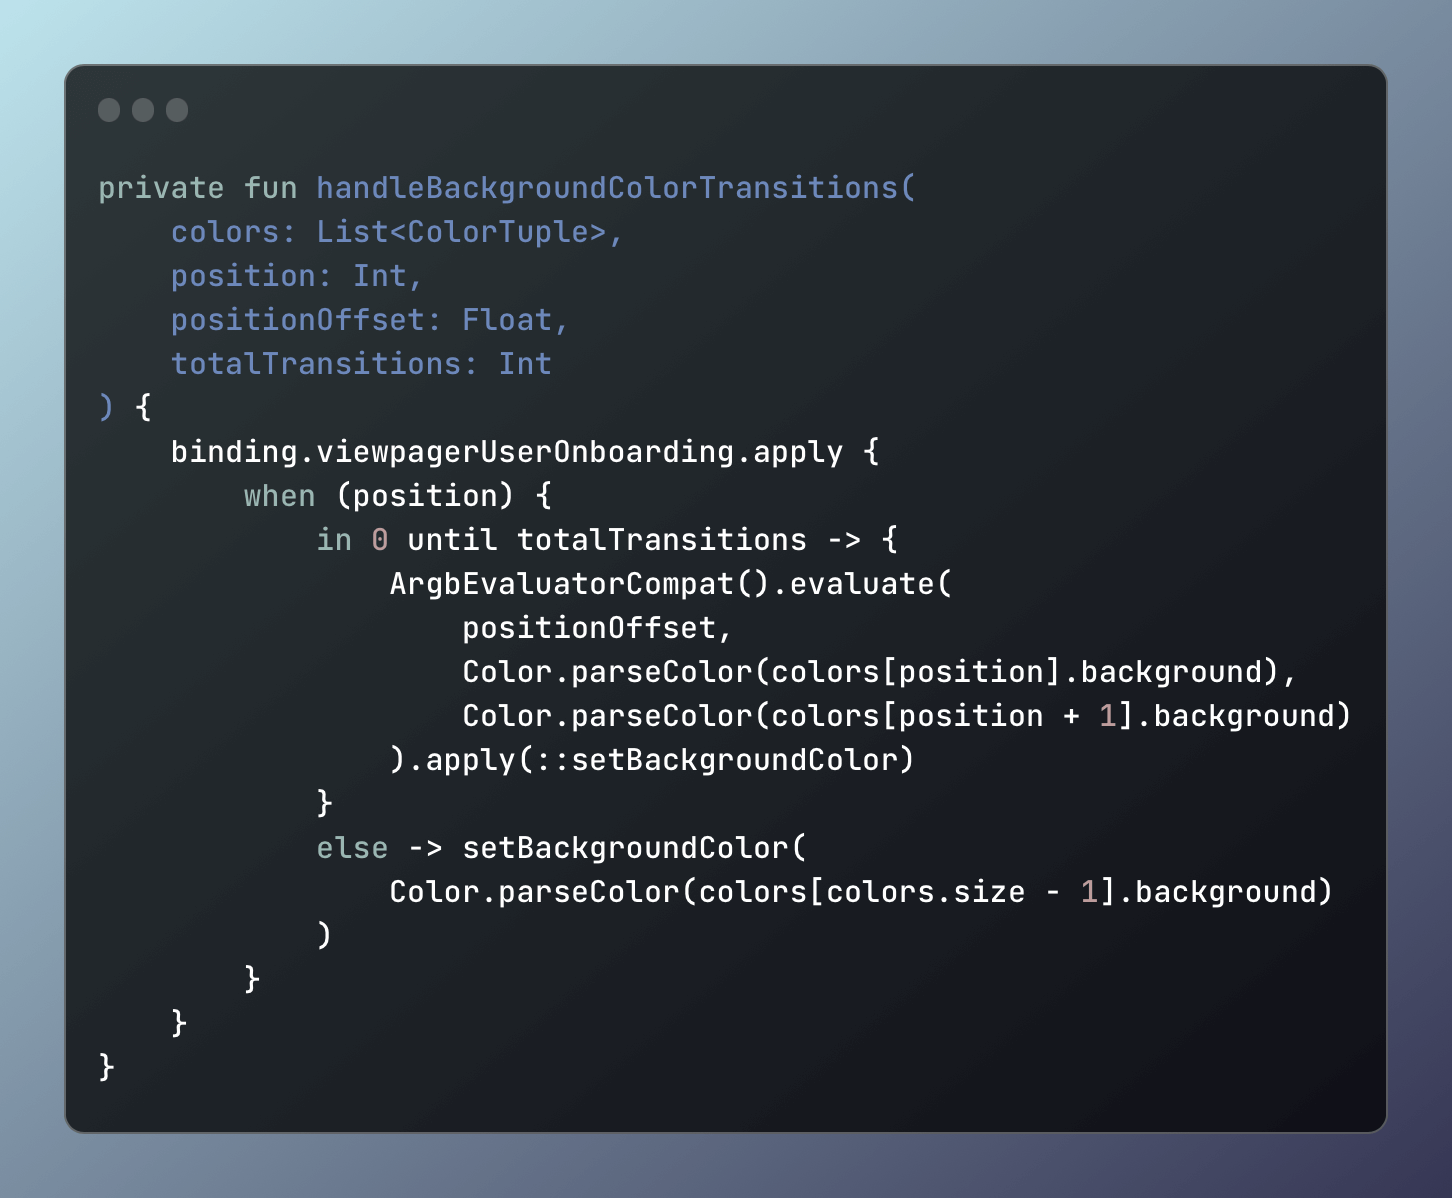
The smooth background colour transition between, Black, White and Yellow, and the transitory colours in-between are calculated using ArgbEvaluatorCompat class available as part of the Android Material library.
Synchronisation of UI elements with scroll
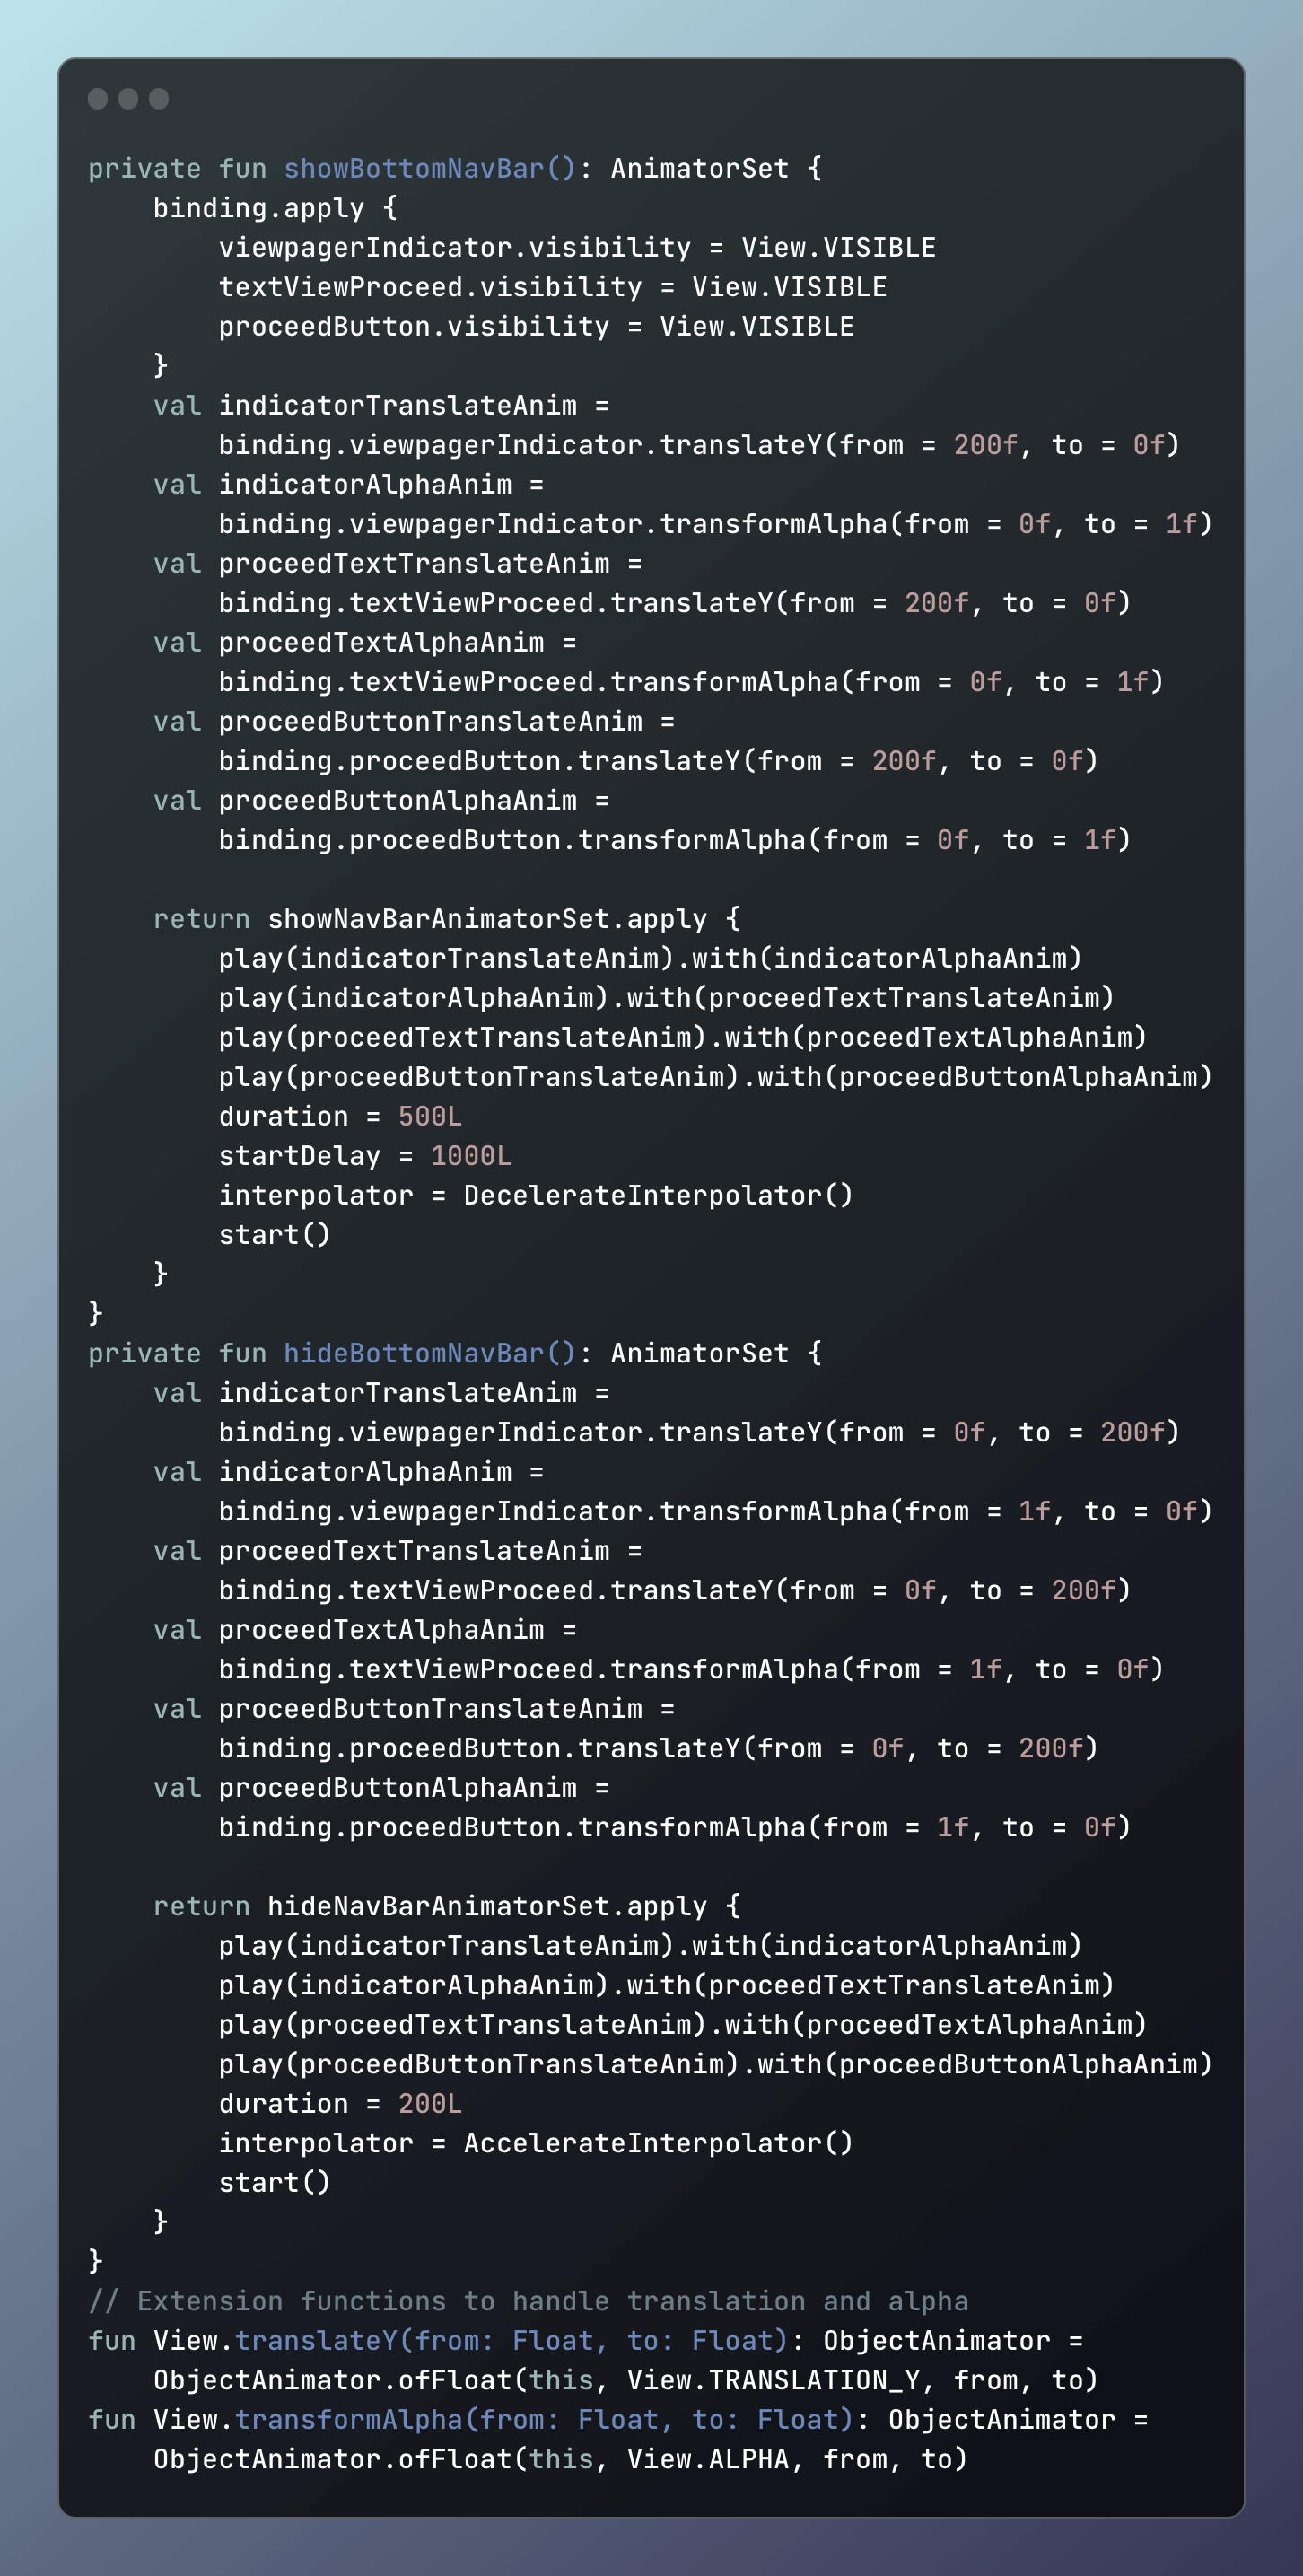
The visibility, alpha, and translation behaviour of the UI elements like the Page Indicator and the text in the Navbar are controlled using two appropriately name methods — showBottomNavBar() and hideBottomNavBar() given as follows:

The implementation is pretty straight forward with the usage of ObjectAnimator to control the Y-axis translation and Alpha channel transformation of the Navbar UI elements, which are handled using the extension functions translateY() and transformAlpha() on the View class.
This brings us to the end, where we saw how Lottie Animations working with JSON files, coupled with ViewPager and some clever maths can allow us to create powerful and elegant animations so easily.
